Showing posts with label gencon. Show all posts

Tuesday, August 26, 2014

Building the new robot for GenCon 2014

My little walking robot, that this blog was originally created to describe, gradually beat itself to death through performing at conventions and Makerfaires over a period of several years.  Broken servos were easy (if expensive) to replace, but eventually welds cracked in the legs and the servo control board developed intermittent faults.  Fixes to the structural problems just made it heavier and pushed the already overloaded servos further.  About a year ago I gave up and declared it dead.

Earlier this year I decided to rebuild a new walking robot from scratch.  I had at one point looked at tiny inexpensive plastic-geared micro servos as a possibility for a walking robot.  Initially I thought them too weak and small for use in any walking robot, but after seeing several successful robots using them I decided to try and rebuild my walking robot based around them.


I knew from my earlier experimenting that these micro servos would burn out if I ran them at 6V like I had in the earlier robot.  Rather than drop the 8V from a two-cell LiPoly down to 5V or lower, I decided to just run the servos directly off a single cell LiPoly instead.  4V is less than the maximum these servos should be run at, but I figured that it would help them last longer without overheating.  I wasn’t going to be getting much torque out of them, so I’d need to make the robot as lightweight and small as possible.


I made as much of the structure as possible out of 3D-printed parts.  My original justification for getting the 3D printer was to print parts for robots.  I spent a few years making homemade transformers and other fun things instead, but now I’d finally be getting to making robot parts.  The printer was really great for this job, the fact that I could make parts in complex arbitrary shapes, compound curves which would be very difficult to make with sheet metal and internal stiffening ribs without welding or machining, really helped with my goal of making the bot with as few overall parts and fasteners as possible.  


Thanks to the 3D printer I was quickly able to go through multiple sets of test hardware, tweaking the design to get the clearances and geometry just right. It also meant I could fairly easily make an entire set of spare structural parts.  I didn’t expect to need them, but once I had the design finished it cost very little in materials or time to print more out.


I kept the same overall proportions as the previous robot, but scaled down everything by about five-eighths compared to the original.  I wanted to try and make the legs as short as I could get away with, reducing the torque load on the servos while still keeping the legs long enough for decent speed and mobility.  The center sphere, which in the original had been made from a three-inch copper tank float, would now be a plastic ball about two inches in diameter.  The leg span at full extension would be just about eleven inches.  I expected to be able to reduce the weight to about a quarter of the previous design. 

Sadly the printed plastic parts don’t quite have the aesthetic charm that the old polished metal ones did.  My robot’s gone from a steampunk inspired hand-made design to one that looks more like a mass-produced toy.  The final colors were somewhat accidental - I had a different color scheme in mind originally.  I printed out some test pieces in white, then switched to red and yellow, colors I don’t use much outside of test prints.  I liked the resulting look enough to make the entire robot in those colors.


I decided to switch to easily replaceable battery packs rather than attempt to cram in a single battery capable of running for an entire convention.  I got a really good deal on five single-cell 380mAh battery that would just fit inside the two-inch sphere, with enough space left over for the radio receiver. Of course, I added battery protection boards onto each of them to make sure that the robot wouldn’t go up flames in case of a short circuit.  I designed a printed shroud to go around the battery which I hoped would make it easy to swap out batteries without needing tools at the convention.  Unfortunately the plastic snaps came out stiffer than I'd have liked, and I needed to use pliers to pull the battery out at the convention.  It was still reasonably easy to swap the battery packs out.


With the battery pack and the Xbee radio taking up nearly all the space inside the robot, there wasn’t enough room for the Xbee breakout board I had used previously, let alone that and a Pololu SSC or Arduino Mini to do the serial-to-servo conversion.  I had to make my own controller board, using tiny right-angle headers mounted sideways on the board and fitting the PCB itself directly between the pin headers on the Xbee radio.  The board would have to hold a PIC16LF873A microcontroller, 3.3V regulator for the MCU and radio, clock generator and other required components, as well as the connectors for the battery and servos.  The servo leads and connectors actually took up a lot of the interior space - when you only have a 2 inch sphere to work with, trying to fit 8 3-pin headers takes up a painfully large chunk of the available real estate.

I designed the PCB using the layout tools I have available at work, and then ordered it through OSH Park.  OSH Park was quite easy to work with and helped me configure my PCB design software to produce the right output files for their process.  The cost for the three boards they sent me was amazingly low compared with other prototyping services, only $9 for three identical boards which was even less than it would have cost me to set up to etch them at home.  The quality was a lot better than I’ve ever been able to do with etching myself too.  They also had no problems with the boards being odd, non-rectangular shapes, unlike most prototyping services that require rectangles of predetermined sizes.  The only downside to OSH Park’s service is that it’s not speedy, the batch-process system they use to keep costs down means they have to wait until they get enough orders before they can send boards to be manufactured.


The radio receiver, controller board, battery, and connectors occupy a box about an inch square down the center of the two inch sphere center body.  It's really tightly packed in there.  I had to make cutouts in the PCB and battery support structure for the inner mounting tabs of the leg servos, and leave channels in the surrounding support structure wide enough to feed the servo leads through.


The firmware I wrote for the controller in the robot is really simple.  It’s essentially doing the same job as the Pololu SSC I used previously, but with a simpler protocol, lower data rate, and coarser resolution.  The receiver takes a data stream at 8929 baud (it was supposed to be 9600 baud, but a PIC16LF873A running off a 4mhz crystal can’t actually match a 9600 baud rate) with each servo encoded as a single byte of data, and outputs eight 0.524ms to 2.500ms pulses, one for each servo.  The output resolution is fairly coarse (about 0.7 degrees per LSB) but I figure that these cheap all-plastic servos are going to be lucky to be within five degrees of the commanded position anyway so it really doesn’t matter.

I used the same transmitter as on the previous version of the robot.  The only change I made was for the new serial output format for talking to my controller instead of the Pololu SSC board.  I did have some problems with the transmitter at the convention, and I’ll probably be completely redesigning it for next year.

The controller board was the long pole in the project, once it was done and programmed everything came together quickly.  There were a few design issues with the board that I had to fix with cutting traces and soldering additional parts on. For one thing, the Xbee receiver uses a lot more current than I realized, requiring me to solder a larger 3.3V regulator on.  I’ll be updating the PCB files and publishing them once I’ve cleaned up the design.

With these cheap little servos, and my previous experiences with them failing after a few seconds of running under load, I wasn’t sure that this robot would even be able to hold up its own weight without breaking.  I was therefore pleasantly surprised when the new robot not only stood but nimbly walked around, waved and rolled over just as well as the old one had.  Some quick testing showed that a single fully charged battery would be good for fifteen minutes of solid walking, and that I was able to go through several full batteries walking the robot around my living room without any servo failures.  Testing at work showed that the radio range was more than sufficient for the robot to still walk while at the other end of the longest hallway in the building, something that I had been worried about as there was no room for any kind of external antenna on the robot.


With everything tested and seeming to work, I packed the robot and all its spare parts and was off to GenCon.

Monday, May 12, 2014

Gencon 2014 scheduler update

 I have updated my scheduling script for GenCon 2014. I had originally not expected to have to make any changes to the code, but GenCon this year moved the location of their event catalog files, and decided to only release the event catalogs in xlsx format instead of csv.  While you can still use last year's version of my scheduler by manually downloading and converting the catalog files, I've modified my code to use a converter utility to do the conversion.

The latest version of it can be found here.

In order to use this, you will need to install Python 2.7.  You will also need to install this xlsx to csv converter code. After installing xlsx2csv, you'll have to copy the xlsx2csv.py file from the install directory into the same directory that the schedule solver python file is located.

The GenCon event registration system is also limiting event wish lists to 50 items this year, so the wishlist generator will limit itself to that number of wishlist items.

As before, this is an experimental and somewhat crude schedule optimization utility.  It allows you to search the event catalog with a text-based interface, add events to your wishlist with assigned priorities, and then generates an optimal schedule for you, as well as a wishlist to enter into the GenCon registration system.

Friday, May 3, 2013

Gencon Scheduler Script Update

As it is nearly time for the annual hectic GenCon event scheduling frenzy, I have updated my schedule-planning script.  The latest version of the script is available here.

A stand-alone application version of the program is available here.

This script is a utility I wrote in Python to help in the complex process of searching through the 9000+ individual events in the GenCon event catalog and finding the optimal mix of things to do at the convention.  Like to the Highprogrammer search tool, this script can search through the event catalog and filter events by time, type, organizer, system, age, etc.  Unlike the highprogrammer tool, this script runs completely on your own computer (once it downloads the catalog from the GenCon site) so you don't need to worry about Highprogrammer going down.  But it also does a lot more.

In addition to the event search function, this script also has a schedule optimization mode.  After running a search on the event list and finding an event that interests you, you can add that event to a wish list and assign a priority rank to it.  Once you have gathered a selection of events you might want to attend, the schedule optimization function will run through every possible combination of events to determine the best possible convention schedule for you.  The search tool is also smart enough to recognize that many of the events at GenCon are run at multiple timeslots throughout the weekend.  You simply specify that you'd like to attend an event and the schedule optimizer will pick the best slot for you to attend considering other possible conflicting events.

The script also has a function to guide you through the registration process, filling out your online wishlist with events as determined by your optimal schedule and all the less-optimal schedules yo might fall back on if you don't get tickets to your highest-ranking events.  This function is still somewhat experimental, but does seem to work.

For this year I've vastly improved the code that digests the raw event list files.  It should be a lot more robust to GenCon suddenly deciding to change their catalog format again.  I have also greatly improved the search algorithm, it can now process complex search queries like "Find any pathfinder by paizo on thursday or friday not before noon".  The schedule optimizer also now has a set of user-tweakable rules for things like minimum hours of sleep per night and maximum contiguous hours of gaming without a break.

Now for the downsides.  This is a script, not a stand-alone application.  You will need to download and install Python 2.7 (not 3.x!) for this to run.  The code is not terribly well optimized, some of the functions are quite slow.  Updating the event catalog from the GenCon website in particular takes forever.  The interface is a command-line text interface, there's no GUI or anything friendly like that, but there are some built-in help functions to tell you how to use it.

The first time you run the script, it will automatically connect to the GenCon site and download the event catalog.  At the time of this writing, that catalog does not exist yet, so the script will fail and quit.  I am at the moment assuming that GenCon will be putting this year's event list in the same place as last year's and storing it in a similar format.  If they don't, I'll be updating this script shortly after the catalog becomes available.

Update:  As of the evening of May 8th, the event catalog is live, and my script is successfully downloading and processing it.

Tuesday, August 21, 2012

Gencon - event reviews

TDA1235549: Giants' Travail

This year True Dungeon had a new space in one of the giant convention halls in the ICC, rather than the ballroom of the Marriott as in previous years.  They used the new space to add extra features - crafting vendors, a tavern and dining area, even some side quests - to turn True Dungeon into a full MMORPG type experience.  I wasn't interested enough to try any of the side stuff, being only there for the main dungeon runs.  The best thing about the new location for me was being conveniently located near the boardgame area and dealer's halls.  The only complaint I have is that it was very dimly lit, even the dining and meeting areas - I almost couldn't find the friend I'd arranged to do the run with.

I did this run with a friend of my wife's who had purchased some large number of token packs in advance.  She gave me a full set of rare tokens, nowhere near as nice as the ultra-rare set she had but far better than the gear I came with.  She also took over as leader of the party, which helped - one very important factor in a True Dungeon run is having a unified party with a single person giving the orders!  The adventure itself was a nice mix of puzzles and combat.  We failed one room, a puzzle where we had to arrange the party in a line and pass clues from one end of the line to another by whispering from person to person.  Other than that we passed every room, and a good time was had by all.
 
BGM1233056: RoboRally: Time Twonky

A custom RoboRally game, this one having a setup where the game was run on three boards simultaneously and the robots could choose which board to run on at the start of each turn.  The main effect was to allow a robot in trouble to easily jump to a quieter map to shut down and recover.  A fun game, although a bit light on new mechanics.


RPG1231651: NASCRAG Charity Event

Scheduling this event was a mistake.  It's not that I have anything against the NASCRAG event, which was well-written and funny.  I'm glad I had a chance to try a NASCRAG event.  The mistake was in scheduling this event - a 4 hour long event involving roleplay and improv and other things I find mentally challenging - immediately following the 4 hour RoboRally event - which was also mentally challenging.  At about the third hour of the event I was mentally and physically exhausted and had a headache developing, and had to withdraw from the event.  I wasn't the only one, either - another player had to drop out and leave before I did due to exhaustion.  So, fun event, but I would have enjoyed it more if I'd been well rested going into it.


BGM1231471: Super Robo Rally

This was a large-scale RoboRally event, with board and robots made from Lego mindstorms robotics.  Everything was automated and computerized - the players used cards with RFID tags embedded, that were fed into an automatic card reader, and the robots then ran through the entire turn on their own according to the programmed cards.  It wasn't much of a Roboralley game - the effective board size was small, the event was only an hour long, and the rules were a limited subset of the normal Roboralley rules.  It was interesting more for the novelty of it working at all rather than for the game itself.  I probably won't do this again if they're back next year, but I'm glad to have tried it once.

It did give me some ideas for a different type of automated Roboralley setup that I might build some year.


BGM1233064: Dragon Dimension/Big Bang

Two experimental games being tested.  Big Bang was a very short and simple game, the result of a contest to design a game using only six cards and one die.  A fun ten-minute experience, the kind of thing you could play while waiting for pizza to be delivered.  Dragon Dimension was a significantly more complicated event, involving moving pieces around a map, summoning dragons, destroying helpless villages, and fighting other dragons.  The optimal strategy was a little hard to figure out beforehand.


CGM1233707: XXXenophile

The same game mechanics as Girl Genius, but with R-rated artwork and occasional instructions to remove clothing or perform various physical acts.  The group I was playing with ignored those instructions.  I suspect the game would have been more fun played with the right group of friends and all optional instructions followed.

 
BGM1233048: Turtle Soup

Another experimental game being tested.  In this one the players attempt to guild groups of baby turtles past various hazards to reach the open ocean.  The main failing of this game was the lack of meaningful strategic interaction between the players - we might as well have been each playing the game solo.  The one thing the players could do to deliberately affect other players was to shuffle terrain tiles around to make or break paths to the ocean, but that permitted little strategic choice as those changes usually helped or hurt all players equally.  I had a chat with the GM afterwards about ways to improve the game design.

 
TDA1235937: Draco-Lich Undone (puzzle-oriented)

I picked the puzzle-oriented version of this run because I didn't think I had good enough gear to do well on the combat side.  Of course, that was before I knew my wife's friend was going to equip me with her cast-off rares.  There was only one room with required combat on this run, and we aced it easily.  We did fairly well on the puzzles too, only failing one room that required us to use long wooden poles to carry buckets from one side of the room to another.  We knew what we had to do, but were too clumsy and spilled the buckets.  We solved the rest of the rooms, although I don't know how much of that was due to cleverness on our part versus people knowing the answers going in due to word of mouth or having done the puzzles earlier in the weekend.

Overall I thought the quality of the actual adventure runs at TD were better this year.  After the 2011 events I had been considering not returning for 2012, but after 2012 I have no such considerations about 2013.  The one thing that was lacking this year was additional lore and videos.  There was no preview video, no video at the end describing the state of the story, no clues on the TD forums beforehand, and no closure other than the end room GM telling us "Yep, Smoak's defeated for good now.".  I understand that they were a bit busy ramping everything up for the new event space, and TD isn't really a roleplay-focused event, but I did feel the immersion was lacking this year.


BGM1233058: RoboRally: 3D

This was the final event I registered for at this year's convention.  A RoboRally game on an initially empty board, with rules mechanics that permitted players to drop, pick up, or move blocks and ramps to change the playing field each turn.  I had a great time in this one.  This is the type of RoboRally event I like - where new game mechanics are added that give an additional level of strategic choices to the players.  It was reminiscent of the "Planet Robo" event run some years back by the same people, where the players could drop board elements (conveyors, bridges, pits, etc) before or behind their robots as they moved.

A common problem with RoboRally games is the tendency for a robot which manages to get ahead of the pack to stay ahead of the pack.  The biggest impediment to a robot is the other robots, so any robot who gets away has an advantage and tends to stay in front.  The custom rules in this event unfortunately tended to make this effect worse - robots could only drop blocks nearby and couldn't pick up blocks near other robots.  A robot ahead of the pack could drop blocks to make it go faster (conveyors and such) and barriers behind to slow down the others, while the rest of the pack would be unable to stop it and instead would be slowing each other down.  Halfway through the game, at the third flag, I managed to get ahead of the rest of the players, with a few lucky card draws and well-placed blocks, and from there was able to race ahead untouched and maintained a clear lead until the end.  I think the rules for where and when robots could drop and pick up blocks could have used some tweaking, but this remains my favorite event at this year's GenCon.


Gencon - post-event report

GenCon 2012 is over, and we're back home.  I had an amazing time - mostly due to the events I was in, as I scheduled too many gaming events and didn't have time for much else.

The convention was, as usual, crazily crowded.  The sprawl of the convention - including the convention center itself and the attached hotels - seems to expand every year.  This year I didn't even get to many of the outlying hotels, as nearly everything I had to do was in the main convention center and I didn't have much time to explore.  The nearby restaurants seemed crowded, at least what I could see of them - there was actually a line to get into the Old Spaghetti Factory for lunch on Friday!  There was a biker event in town Friday and Saturday, and I think a concert or two as well, which just added to the crowds and noise.

I was not able to spent much time showing off the robot for people.  The battery pack in the robot has been losing capacity for a while.  I knew it was happening, but didn't realize how bad it was getting until this weekend, when attempting multiple full charge-discharge cycles revealed how bad the problem had become.  By Friday night, the battery would no longer take any significant charge, and I retired the robot for the weekend.  Time to buy a new battery pack - and this time, I think I may buy several and design to be able to swap them out easily.

The Towardpro MG996r servos I had been using since last year were pretty badly worn - despite the unexpected inclusion of brass bosses around the gear shafts, there was significant wear and damage to the servo cases.  My usual supplier of these servos was out of stock, so I ordered a batch from an Ebay retailer.  Big mistake - the servos I received were labeled the same, but not built nearly as well internally!  It appears that even cheap knockoff brands have their own cheaper imitators.  I ended up using a mixed batch of the better of the old and new servos, including at least one servo made from the case of one of the original batch and the gears of one of the newer ones.  The servos held up well for the convention, but they weren't run very hard due to the battery problems.  I'll have to order a complete replacement set - from a reputable dealer - before the next big event.

Or, I might just design something completely new for next year.  Having access to a 3D printer opens all sorts of options for new designs.

Monday, August 13, 2012

Drew's Gencon Schedule

 This year I was highly successful in getting events for GenCon.  I used my GenCon planning software to chose an optimal schedule of events, and then when event registration opened I got a very good queue position.  (This wasn't entirely due to luck.  There are some tricks that still work for getting a good position in the registration queue.)  I managed to get tickets for every one of my highest-priority events - a big difference from last year, in which I didn't manage to get any of my top choices.

Of course, this means that I've scheduled so many gaming events I'm not sure if I'm going to have time to eat or tour the dealer's room this year.  I'll try to get some demo time in with the robot, but it's not going to be my top priority this year.


Thursday

TDA1235549: Giants' Travail
11:24AM-1:24PM
 
BGM1233056: RoboRally: Time Twonky
5:00PM-9:00PM
 
RPG1231651: NASCRAG Charity Event
9:00PM-1:00AM


Friday
SEM1235222: Archaeology Vs Pseudo-Archaeology
9:00AM–10:00AM

BGM1231471: Super Robo Rally
12:00PM-1:00PM
 
BGM1233064: Dragon Dimension/Big Bang
2:00PM-4:00PM

SEM1229856: Women and Gaming
4:00PM-5:30PM

CGM1233707: XXXenophile
8:00PM-10:00PM


Saturday
 
BGM1233048: Turtle Soup
10:00AM-12:00PM
 
TDA1235937: Draco-Lich Undone
2:49PM-4:49PM
 
BGM1233058: RoboRally: 3D
5:00PM-9:00PM

Thursday, August 2, 2012

Convention food: Homemade snack bars


Gencon - the wonderful gaming convention my wife and I attend every year - is less than two weeks away.   As usual, all thoughts of moderation fled when I downloaded the event schedule, and I have signed up for at least 8 hours of events every day of the convention.  On top of that, there's a motorcycle rally in the city the same weekend, plus a concert or two and some other events going on.  Between all that and the 40,000+ gamers at the convention, I expect it to be nearly impossible to get into any of the city restaurants for food without a multi-hour wait - which I won't have the time for.

Sure, there's always the Indy Convention Center food court, but the food from there is terrible, overpriced, and rumor has it there was some nasty food poisoning going around last year.

My wife taught me the habit of preparing non-perishable food before conventions and long trips.  She's been making jerky and fruit leather for some years.  I've learned to make a sort of homemade snack bar, useful for those marathon gaming sessions when I won't be able to get out for real food.

This year, I've made three batches of snack bars:  a coconut-pineapple batch, an experimental chocolate-chip batch, and a kiwi-strawberry batch.  The recipe starts out essentially the same for all three.


The Recipe

The recipe is made up of three main parts.  First is an oat-based dry mixture that's toasted in the oven before mixing with the other parts.  The second part is a wet sugar and honey based glue material that needs to be heated and melted before mixing.  The third part is dried fruit or similar non-cooked material added into the mix at the last step.  The exact recipe of each part can be varied to taste, so long as the overall ratios are kept about the same.

Timing is important, as you want to mix the three parts and press them into the final form while the dry mixture and the glue are both still hot, as they will solidify and become unworkable as they cool.  You will want to have all your ingredients measured out and ready before starting to mix anything.


Part 1:  The dry mixture.

We start by preparing the dry mixture.  I use a large glass casserole dish to mix the dry ingredients.


First, two cups of Old Fashioned Quaker Oats, to make up the bulk of the bars.

Add three-quarters of a cup of ground flax seed or wheat germ.  I'm using flax seed here.


Then add three-quarters of a cup of shelled, unsalted sunflower seeds.


Now we need about a cup of finely chopped nuts.  You can buy chopped nuts, or you can get whole shelled nuts and crush them yourself.  For the first batch of bars (coconut-pineapple) I used a package of macadamia nuts, which are soft and quite easy to smash, along with some walnuts since I didn't quite have a cup of macadamias.


To crush them, put the nuts in a plastic ziplock bag, then carefully whack them repeatedly with a measuring cup or other heavy blunt object.  You can also use a fancy nut chopper or wooden mallet to do this.


Finally, for the first batch of bars (pineapple-coconut), I added three-quarters of a cup of dry shredded coconut to the mix.  The other two batches didn't get anything else added at this step.


Now stir the ingredients in the casserole dish, mixing them evenly.  Heat your oven to 400 degrees and put the casserole dish in the oven.  Set a timer for 12 minutes, and then while the dry mixture is roasting you can prepare the second part of the recipe.


Part 2:  The glue mixture.

 Put a medium-sized saucepan on the stove over medium heat.


Melt 4 ounces - half a stick - of unsalted butter (or you can use salted, but then reduce the amount of salt added later) in the saucepan.  Be careful not to burn the butter, you want to just melt it gently.


For the basic recipe, measure out two-thirds of a cup of brown sugar, and two-thirds of a cup of honey.  You can optionally replace some of the honey with any similar sweet syrupy material.  Maple syrup works well.  You can use molasses, but it has a strong flavor so use sparingly.  Chocolate syrup can also be used, as can peanut butter, if you want to add those flavors to the bars.


Add the sugar and honey to the melted butter, and stir well.  While stirring add half a teaspoon of salt and two teaspoons of vanilla extract.

While the glue material is simmering, you should periodically open the oven and stir the roasting dry mixture with a heat-resistant spatula to make sure it cooks evenly and doesn't burn.


Part 3:  Dried fruit or similar flavoring ingredients

While the dry mixture is roasting and the glue is simmering (don't forget to stir both periodically!) prepare your dried fruit.  This part is where you can experiment the most with varying the recipe in order to give each batch a different flavor.

For the first batch, I bought a package of dried pineapple.  Dried pineapple comes in two different basic types - there's the heavily sugared stuff that looks like chunks of golden jelly, and the natural stuff that's flat and stringy.  So far I've only used the first type for making these bars, although it should work just as well with either.

To mix evenly with the other ingredients, you want the dried fruit to be finely chopped.


My trusty ulu works great for this.


Nearly any kind of dried fruit should be usable in this step.  In theory, you could also use chocolate chips or small candies if you're making a dessert bar.


Part 4: Mixing it all together.

Once the dry mixture has been toasting for 12 minutes, the glue is melted and ready, and the fruit is chopped, it's time to mix everything.  You'll want to do this quickly, getting the materials mixed while hot before they start to set up.

Take the dry mixture out of the oven, and transfer to a large mixing bowl.  Do this carefully, as the material will still be quite hot.  Then pour the heated glue into the bowl, and start stirring.  Add in the dried fruit or other ingredients.  Mix well, making sure to get all the oats and such fully wetted with the glue.


You can turn the oven off at this stage, you won't need it anymore.

Once the mixture is fully blended, turn back to the still-hot casserole pan you roasted the dry mix in.  Clean out any remaining bits of oats or whatever, and then line the pan with wax paper.  Transfer the still-hot mixture from the mixing bowl into the casserole pan, and spread it evenly.  Then take a second piece of wax paper, and spread it over the top of the mixture.  Press down on the wax paper.  You want to compress the mixture into an even layer and press out any air remaining between the grains.

Let the snack bar mix in the casserole pan cool to room temperature.  Then transfer it to the refrigerator to let it cool and harden further.  You could theoretically put it straight into the refrigerator after pressing it into the pan, but I worry about thermal shock cracking the glass, so I let it cool in stages.

After the snack bar mixture has cooled and hardened, remove it from fridge.  Flip the pan upside-down over a cutting board, and pull down on the wax paper until the mass comes loose.  Peel off the upper wax paper sheet.


Now, with a sharp knife, cut the snack bar mix into 16 (or however many you desire) bars.

You can wrap or bag these individually and store them in the fridge or freezer.  They should keep for quite some time.  I like to vacuum-bag them and put them in the freezer, thawing them out only right before the convention.


The Black & Decker food saver took some time to learn how to use reliably, and doesn't work well for all types of foods.  I have managed to get it to bag and seal these bars consistently now.


The coconut-pineapple bars were a recipe I'd made before, and one I knew would work well.  For the second batch, I decided to try a more dessert-type recipe.  I substituted a bit of chocolate syrup and molasses for some of the honey, and used chocolate chips instead of dried fruit.  I also used chopped hazelnuts and pecans in the dried mix instead of macadamias.


The chocolate chips melted the instant they hit the other still-hot ingredients, so rather than the effect of having chocolate chips embedded in the oat mixture I ended up with a homogenous chocolate-flavored bar.  It still seems to have come out reasonably well.


For the third batch, I decided to make my own dried fruit, using our dehydrator.  Ideally, this would have started with a trip to one of the local pick-your-own farms to gather ingredients by hand.  Sadly, the heat and drought we've been having this year mean none of the local places had a decent crop.  I had a hard enough time even finding a decent selection at the supermarkets.


After throwing out the spoiled ones, I have enough strawberries for a third batch of bars.


The tops are cut off, and the rest are sliced into pieces about an eighth to a quarter inch thick.  These go into my wife's food dehydrator, set to low and left to run overnight.  You want to make sure they get fully dry to the point of being crispy - any moisture will make them spoil faster.


I combined the crispy dried strawberry flakes with some dried kiwi fruit I bought at a store.  I had originally bought the dried kiwis for snacking, but didn't like them much after trying them.  I figured to try them in this recipe.  Note that like the pineapple chunks, they need to be chopped further to mix evenly.


For the dry mix, I omit the dried shredded coconut, and used chopped walnuts for the nut ingredient.  In the glue, I substituted a little Grade B maple syrup (darker, with a stronger flavor) for some of the honey.


This batch came out beautifully.  Very sweet, with strong kiwi-strawberry flavors, and visually is very distinct with the red and green of the dried fruit visible in each bar.  I'm calling this a success.

With these - and the jerky and fruit leathers my wife will be making next week - I should be set for the convention even if I never manage to get out for a real sit-down meal for the entire weekend.

Saturday, May 12, 2012

Gencon Schedule Solver

Gencon has an absurd number of events taking place over the course of 5 days.  Many of these events are things I'd like to attend, with varying degrees of liking.  Many of the events are run at different times through the weekend, giving me multiple opportunities to attend them.  Some events - such as the True Dungeon events - have over 100 timeslots, others have only a few.  The number of possible schedule combinations are huge.

I could simply pull out the calendar and go over it manually, working out the optimum schedule on my own, but I'm lazy, and when presented with that kind of challenge I prefer to automate it.  So I created a Python script.

This script was in part an excuse to learn how to use some of the url library functions in Python, as it connects on its own to the Gencon community file directory and downloads the latest event calendar automatically.  On extracting the event file it then processes it and attempts to find all events which are the same event run in multiple slots, and combines them into single entry.

There's a fairly simple command-line interface I wrote to search the event list to find the events I wanted, and then assign a priority to each one.  The script then works through all the possible permutations of events, assigns a rating to each one, and then either presents the best possible schedule, or walks the user through the registration process and adjusts the schedule as required to account for events filling up.

It's still crude and buggy, but works for its intended purpose - optimizing your event schedule.

I made the mistake of mentioning this on the Gencon community forums, and immediately received requests for the script.

I have put the script on a pastebin page here:

http://pastebin.com/Rmuf0iJS

Or you can download it as a file from here:

http://www.2shared.com/file/QSKfjxeY/Gencon_schedule_solver_2012.html

To use this, you will need to first install Python 2.7.  Then, either download and extract the zipped file, or create a new file in the Idle python text editor and copy-and-paste the text from pastebin.

Run the script.  The first time it is run, it will create a directory for event calendars.  It will ask you if you want to download the latest schedule.  Obviously, you need to say yes on the first time or it won't have anything to work with.  You can then search for events, create wishlists, and then have it solve for optimal schedules.  Command help is imbedded in the script, just type 'help' at the command line.

Tuesday, August 9, 2011

Quick GenCon update

I just attended GenCon Indianapolis 2011 with the robot. Over the course of the three main convention days (Thursday, Friday, and Saturday) I took the robot from fully charged to fully depleted batteries five times without a single mechanical failure - a new record, and actually quite astonishing considering I'm still using $12 cheap import servos. This translated to over two hours accumulated time walking the robot around the convention and entertaining the crowds.

With the new 60mW Xbee Pro radios I did not have a single incident of control failure, even when the robot was 30+ feet away and surrounded by people with cell phones. I didn't even need to use the external antenna on the robot itself.

The MG996 servos held up well, but a few are starting to sound rough. Quick examination reveals that while most of the MG996 servos have brass bushings on their secondary gear shafts, a few still have plastic bushings. I can't see any indication from the outside to tell which is which. When I get back from vacation next week I'll do a thorough teardown and inspection of the entire robot.

Monday, May 17, 2010

An experimental servo modification holds up for the Steampunk World's Faire


After the gears, the next weak spot in the HX-12K servos is the case. I cracked several mounting tabs at GenCon last year. That problem seems to have gone away once I switched to larger rubber grommets around the mounting screws, and made sure all four screws were evenly tightened to spread the load. One servo cracked where I had installed a rear hinge point on the case, but that appears to have been an isolated case, probably due to assembly error on my part.

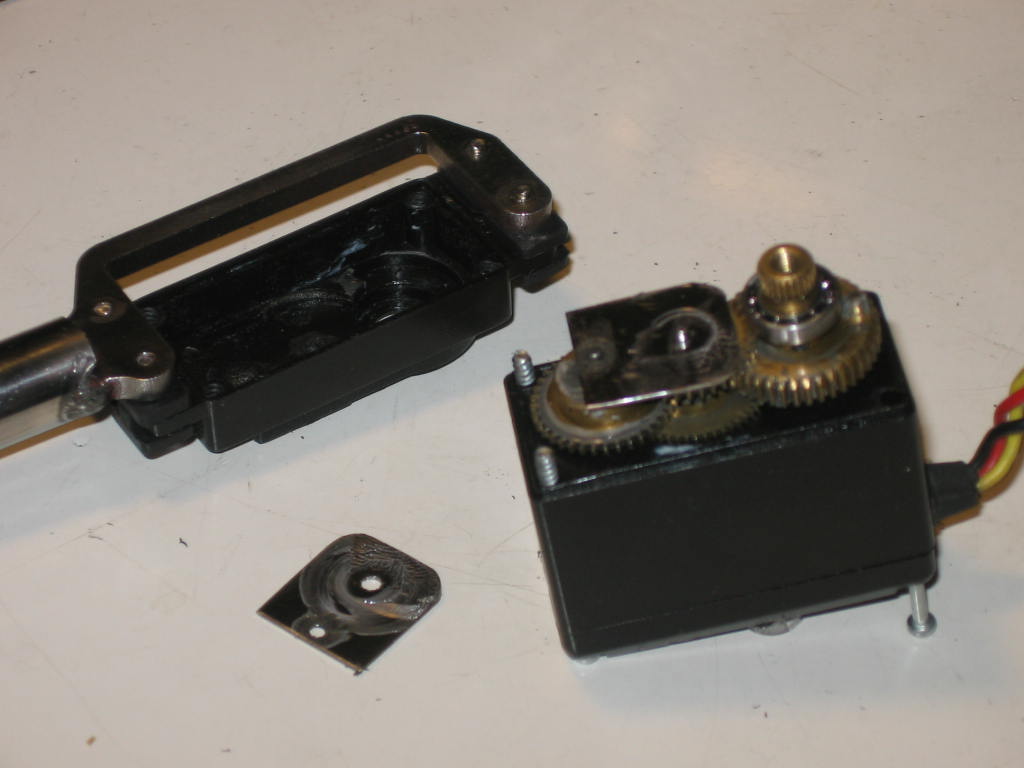
The main failure point now is the mounting of the axle shafts inside the gearbox. The gearbox main shaft is mounted by two ball bearings. I've yet to see that fail. The smaller hears inside the gearbox are located by two smaller shafts, which fit into plastic pockets in the gearbox housing. More expensive servos have brass bushings or even small ball bearings for the intermediate gear shafts, but the HX-12K and even the more expensive HS-5645MG servos have bare plastic there. I have seen on many servos, the HX-12K in particular, these mounting holes widened and even gouged out, allowing the middle gear in the servo to wobble back and forth. This lead to the geartrain coming unmeshed, locking solid, or even in one case a gear wandering into the side of the gearbox housing and gouging grooves in it.

As an experiment I took a few servo cases that were already trashed this way and carefully shaved out all remains of shaft mounting on the inside of the case. Then after carefully measuring an intact servo, I drilled and cut some .020 steel sheet to make locating plates to hold the top ends of the two intermediate shafts. Cutting and drilling by hand, it took several tries to make the locating plate precise enough for the gears to mesh properly and for the servo to run smoothly when reassembled. When the first servo I modified this way ran well during testing, I modified three more.

All four of the outer leg servos on the robot, the ones which raise and lower the leg segments, are now heavily modified hybrid models, having motors and control boards from HS-5645MG servos, the gears from HX-12K servos, and HX-12K cases modified with rear axle points and steel plates locating the intermediate gear shafts. The inner servos, which move the legs horizontally, don't seem to fail nearly as often, so I haven't modified them as much yet.

Wednesday, August 19, 2009

Post GenCon report!

The robot ran at GenCon, getting in about half a dozen full charge cycles in over about three days before it was past the point where I could keep it going. Ultimately while it did succeed at the goal of entertaining others and myself, the performance and reliability weren't quite what I had hoped.

As I'd expected, all the reliability problems were with the servos. Unexpectedly, I didn't have a single gear failure. No stripped or broken teeth on any of the gears, and even the issue with the press-fit third gear coming apart that I'd seen early on one servo during testing didn't come up. I did have failure of the mounting tabs on three of the servos. The plastic web where the servo mounting tabs meet the cases is very thin on these servos. These mounting tabs can take the loads created by the servo torque, but the bending and twisting forces induced by the way all the forces from each leg are transmitted through the servo mounts appear to be more than they can take. I had servo mounting tabs break off on three servos, and so far have found cracks in the case of one more servo.

I also had motor failures in two servos. In both cases while walking the robot suddenly lost all power, apparently due to the overcurrent trip on the battery protector board. In both cases once power was cycled one of the servos no longer functioned, not even in the passive motor-braking mode the servos default to on powerup. I had thought it due to controller board failures, but on disassembly and testing found both motors had failed open. I haven't taken apart the motors to find out while they failed yet, but I suspect heat-induced failure of the connections to the brushes, or the brush holders or springs.

I had expected these servos to have a high failure rate, and designed the robot for easy access to the servos, so even with the high failure rate of these servos I was able to keep the robot working until I ran out of unbroken servo cases. I wasn't happy about having to repair the robot as often as I was having to recharge it's batteries, but I wasn't completely surprised.

The bigger problem was the poor control I had over the robot's motion. The lifelike movements people like about the robot, and the ability to make fins and subtle movements to interact with the crowd, depends on the servos closely matching the movement of the joysticks. On that this version of the robot failed. First of all, the precision of the HX12K servos is utter crap. There's a huge amount of play in the geartrain, which combined with a badly tuned control loop in the servo control board means that the position signal you're sending to the servo is going to be treated as at most a rough suggestion as to the position you'd like the servo to hold. There's a huge amount of overshoot and ringing, the robot's legs wandering and shaking randomly even when sent a steady position signal. Standing still with all four legs on the ground the robot would be stable, but it would shake uncontrollably when holding a leg in the air, and walking was jerky and unsteady. It was a goods thing thing that the ability to invert the legs and walk either side up was always a crowd favorite, because the robot would frequently fall over while walking.

The other problem was that the radio link, which worked fine at home, was unreliable in a convention hall full of cell phones and other electronics. Control was unpredictable - sometimes it would work fine at up to 30 feet, sometimes it would intermittently lock up at less than 5 feet.

I'm also not happy with the Wii Nunchuk joysticks. I just don't get the same fine-control ability as I had with the RC airplane radio set I used to use.

The radio range issue can be easily corrected. At the moment I'm using the 1mW version of the XBee radios. The Pro version of the XBee radio has a transmitter power of 60mW. More power might be the brute force solution of the problem, but that's fine with me. I also have some ideas for rebuilding the controllers with better joysticks stripped out of an old RC airplane set.

The control issues with the servos I can't do anything about without replacing them. Poor position-holding seems to be an unsolvable issue with the MG995/HX12K servo. I suspect that even if I transplanted the control boards from the HS-5645MG servos in my junk box the insane amount of play in the geartrain would prevent them from being accurate enough for my needs.

Some of the more astute of you might wonder, if I've got nice high-quality Hs-5645MG servos in my junk box, why am I wasting my time with cheap import crap like the HX12K? It's because the HS-5645MG gearboxes kept failing. The HX12K servos, for all their faults, at least have bulletproof gears. I may try rebuilding the robot with my old HS-5645MG servos anyway - the spring shock absorbers I built into this version of the robot's legs may be enough to save the gears from failing. There is also a new servo out, the TowerPro MG996, which is an upgraded version of the MG995/HX12K servo with better accuracy and reliability, which I might buy and try out eventually. For the time being my budget is shot and my wife's patience with robots that break after a minute of walking is expended, so buying any new servos will have to wait.

Wednesday, August 12, 2009

Update - day 1 of GenCon

Walked the robot around at the GenCon Stink for a while until one of the servos suddenly stopped working. Gears are intact. Seems to be a dead control board, although nothing is obviously burned out. Swapped the servo and the robot is walking again. Also one slightly cracked servo case and one loose servo horn screw, both easily fixed.

Radio range seems to be a lot shorter than at home. I blame the large number of cell phones. Must invest in higher power transmitter module after convention.