Friday, October 4, 2013

Drew's Dalek Transformer


Decepticons ... Exterminate!


After the 3D-printed Transforming Tardis I designed, the next most requested design was for a transforming Dalek.  This was to be a much more complex design - both because of the more geometrically complex nature of the Dalek compared to the Tardis, and because I wanted to be a bit more ambitious with the complexity of the transformation geometry.

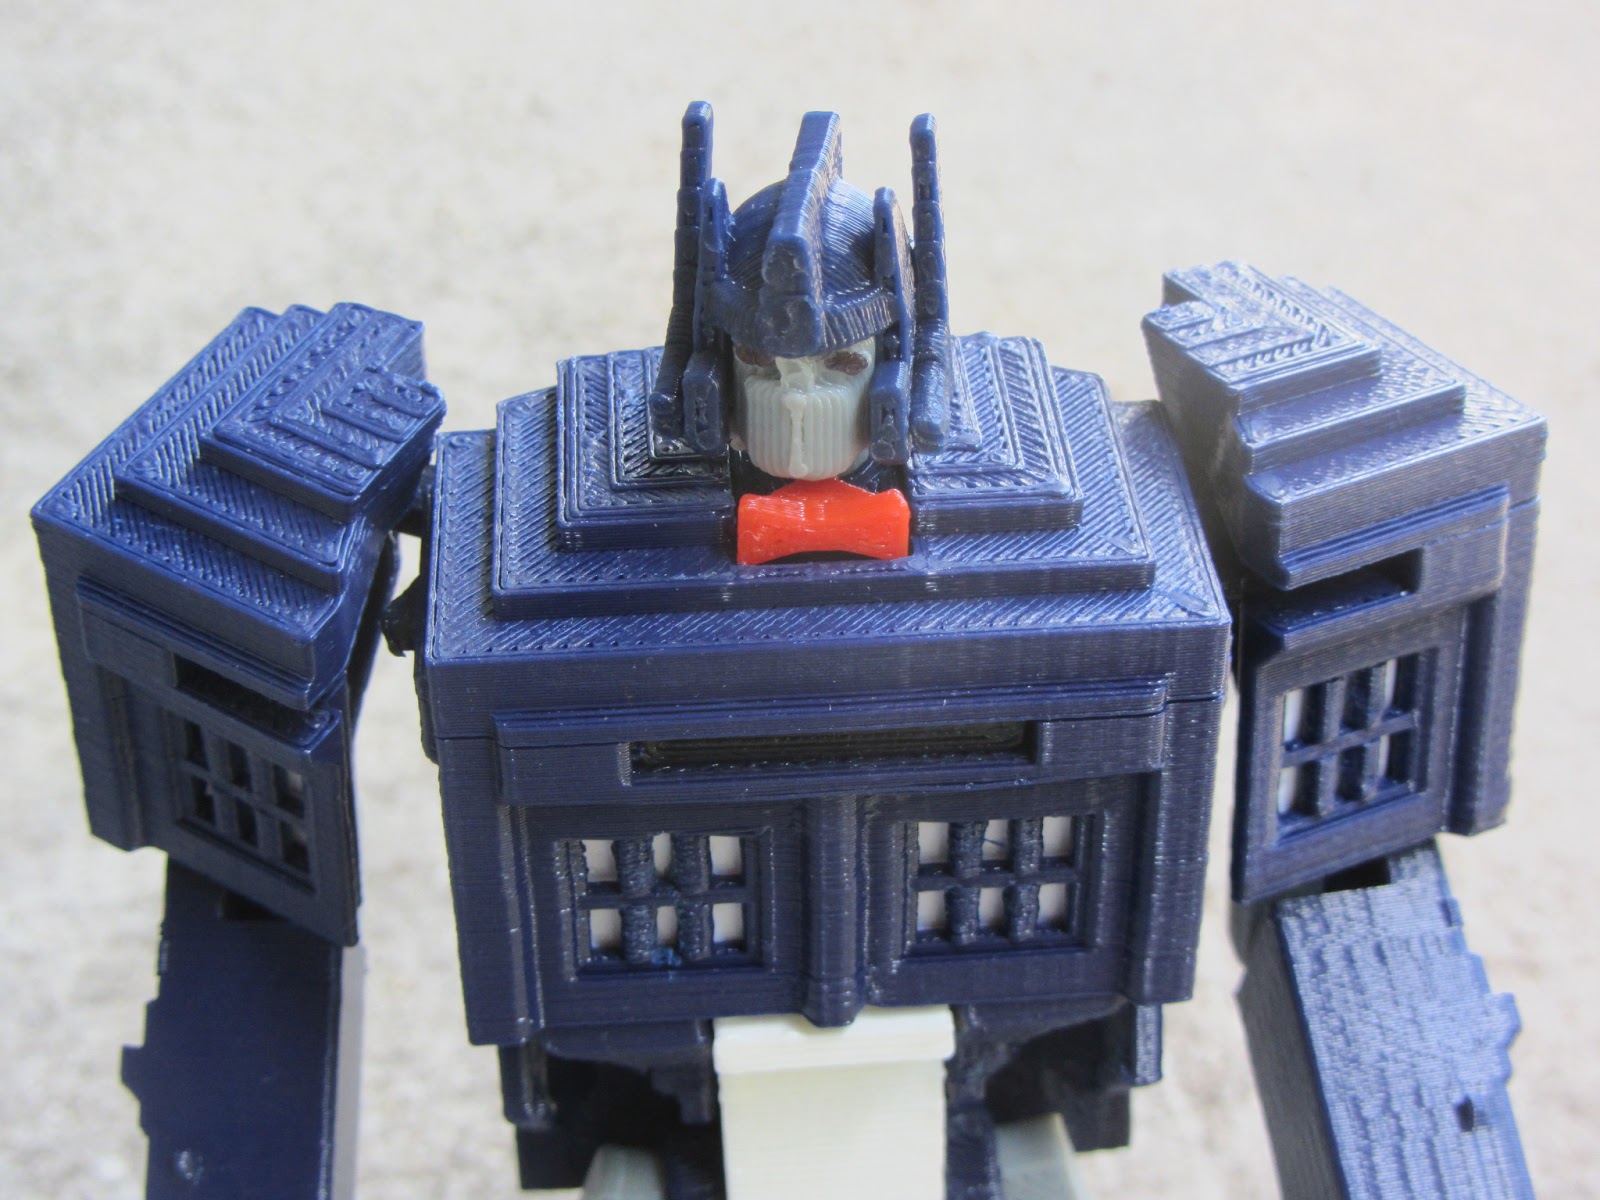
Unlike the Tardis transfomer, which was strongly modeled on the classic Optimus Prime design for the robot mode, my goal for this design was not so much to make a Transformer with a Dalek altmode, as to make a Dalek with the very unusual feature of being able to turn into a large humanoid-ish robot.  As such it isn't based on any actual Transformer, although I did draw some inspiration from Octus, a Generation One transformer that apparently had a Dalek as its alternate form.  I decided early on that I wanted the robot mode to still be recognizably Dalek in design, including having the actual Kaled mutant for a head rather than a recognizable Decepticon face, but I did take from Octus the idea of having the model have more than two arms.  Originally I wanted to give it six full arms, but was only able to make the geometry work with four proper arms and two vestigial ones holding the Dalek gun and plunger.  The robot mode actually ended up being more similar to the Transformers Animated Octus, although this was not at all intentional.


My main art reference for the model was the 2005 Doctor Who episode Dalek.  This episode was the first in the new series to show the new-series Daleks, and really gave a good look at them.  I liked the fact that most of the exterior details were the same color as the basic shell, which would simplify printing as I wouldn't have to make those bits separate parts.  That episode also had a remarkable scene in which the Dalek's casing split open to reveal the Kaled mutant inside, and I decided early on that I wanted my model to be able to do the same thing.  I used pictures of this amazing sculpture as an art reference for detailing the inside of the Dalek.


Purple is about the closest color I had on hand.  I also tried green and grey, but this seems to come out the best.

The Mutant itself was one of the most complex individual parts I've ever drawn.  AutoCad is not terribly good for drawing this kind of three-dimensional, organic shape, but after much effort I manged to make it acceptably well.  I may redraw it from scratch in ZBrush in the future.

Designing this feature into my model meant that the upper body had to be essentially hollow, made up of movable cosmetic panels that weren't able to do much more than hold the shape of the upper body when in Dalek mode.  The bulk of the robot mode - the arms, legs, and most of the torso - all needed to be folded into the skirt of the Dalek, which ended up as a tricky engineering challenge.


Unfolding the limbs - the bottom and front of the skirt become the legs and feet...


Then the arms can swing forward and straighten out.  Two of the arms have fists (actually just copied-and-pasted from the Tardis transformer) while two have more traditional Dalek claws.

Elaborate locking tabs on the feet, knees, and hip joints allow the robot mode to stand upright on its own, not even relying on friction to hold upright.  I learned from the mistakes of the Tardis transformer.

Having the Kaled Mutant taking up most of the available space in the upper body also meant that there was no room for a proper robot head, but that was fine with me.  I was inspired by the mad human-hybrid Dalek Sec from the episode Daleks in Manhatten.  I thought that was a terrible episode, but I did think the form of a human with a Kaled mutant for its head was visually interesting, so I decided to make that part of my model swing up to form the robot-mode head.


The torso unfolds, straightening up with a fairly tricky 4-bar linkage, and the mutant on its pedestal swings up out of the main body.


The two front quarter-panels, holding the plunger arm and gun, swing down and lock to the abdomen parts.  This hold the entire torso upright, and was a really complex bit of geometry to figure out.


Then the rear quarter-panels swing down and tuck in behind the torso, clearing out the space behind the head.


Finally the dome turns around to point backwards, then folds down on its support arms and locks in between the folded quarter-panels.  The dome support arms also carry the front grill panels, and these fit in to fill out the area between the head and torso.


When completely transformed, it stands about twice as tall as when in Dalek mode.  As with my Tardis transformer, it's bigger on the inside than on the outside.

When designing the robot altmode, I wanted to keep aspects of Dalek design philosophy in mind.  First, Daleks were intentionally designed to be menacing and inhuman, lacking in familiar and relatable details.  I wanted to keep that feeling even when the Dalek was transformed.  While it might have arms, legs, and a head, it should still be inhuman and menacing in form.  I tried to evoke an insectile, claw-like shape for the legs, and make the connection between the arms and the torso more similar to how the forelimbs of a grasshopper or similar insect are connected.


Secondly, the Daleks, by their own admission, have no concept of elegance.  Dalek machinery looks functional and brutal, with no care given towards appearance.  Parts are never streamlined or carefully matched, and exposed pipes and hanging wires are common.  This actually meant more work for me, adding those details to exposed surfaces throughout the model.


I think the overall theme of ugly yet brutally functional worked out well.

The finished model has just over 10 ounces of plastic, and I estimate takes at least 24 hours of machine time to print.  (Total design time for me was at least 4 weeks of weekends and evenings, and a large number of scrap parts getting the design right through trial and error).  There are about 100 printed parts in the finished design.  It's not as clean a print as the Tardis transformer was.  There are several parts that need to be glued together, as I wasn't able to make everything snap-fit.  On the other hand, there are still no metal screws or other non-plastic parts involved, and no painting other than a single dot with a black Sharpie to make the pupil of the mutant's eye.

There are also quite a few small, fragile details that are tricky to assemble properly, and the transformation sequence is difficult.  The torso is made up of a lot of parts that want to flop around loose until you lock them together, and when going back into Dalek mode it's tricky to get all the body panels in place.  There are a few bits of geometry I still could touch up to make everything go back together more easily.

I will probably be posting build files and assembly instructions for this on Thingiverse, once I've cleaned up a few details and had a chance to put together a good assembly guide.  This design was mostly a learnign experience for me, as I gained a lot more experience on designing complex 3D assemblies with Autocad.  Autocad really isn't the best tool for this, I was really running into the limitations of the software on this project, so I'm hoping to gain more experience with ZBrush and Solidworks for future projects.


Saturday, July 27, 2013

Drew's Rostock: Replacing the J-head

Several months ago after slightly reworking the wiring to the J-head, the thermistor slipped slightly loose from its socket in the heater block.  The temperature monitoring code in the controller will detect a short or open connection on the thermistor and shut down the heater, but it can't do anything to detect a thermistor that is simply no longer thermally connected to the block, and the heater stayed on long enough to drive the heater block far above its normal operating temperature.  I knew something was wrong when the plastic coming out of the nozzle was bubbling.  Fortunately I noticed and shut the printer down before the plastic J-head barrel was completely ruined, but there was still damage done.  Ever since then the head's been prone to jamming, hard to feed filament into, and reluctant to let go of the filament when I'm trying to change colors.

I noticed a marked drop in reliability while printing the second version of my Tardis Transformer.  Trying to print faster than 30mm/sec inevitably led to a complete filament jam, often requiring a complete dis-assembly of the entire extruder from hot end to pinch wheel to fix.  Finally the entire thing jammed up with a plug of plastic in the barrel that just couldn't remove without destroying the J-head.  Fortunately I had already ordered another J-head, this one with a 0.35mm nozzle as I wanted to experiment with printing more detailed part.


Here's the new head, mounted in the plastic carrier that I use to attach it to the end effector on my printer.  The carrier is two pieces of PLA that clamp the end of the J-head, with guide holes for wires and a place for the push-fit connector to screw in.  In theory, I shouldn't be using PLA to clamp the hot end, since the hot end gets more than hot enough to melt PLA.  In practice, the top end of the plastic barrel never seems to get even close to being hot enough to damage the plastic clamp.

The new J-head seems to be using a different kind of plastic than the previous one was, dark-colored as opposed to the pale tan of the older one.  I'm not sure if this makes any difference, I suspect not.
Wiring the hot end is always tricky.  This part of the printer sees constant vibration, and the wires need to be able to flex freely yet not crack from flexing or vibration.  I've secured the heater resistor and thermistor into the heater block with fire putty, and additionally secured the thermistor cable to the J-head barrel with heat-shrink and copper jewelry wire.  This should help keep it from pulling out of the head again, as well as help protect the fragile thermistor wires from vibration-induced failure.
The final step is to wrap the heater block with insulation tape and Kapton.  This might not be strictly required, but it seems to me to help the head maintain a consistent temperature.  A few overwraps of Kapton tape also additionally helps keep the thermistor in place.
 The main downside to moving to a smaller nozzle is that it will take more force to push filament through the nozzle.  Rostock-derived printers already need a lot of force, with the long Bowden tube and (ideally) high print speed, and even with a 0.5mm nozzle it's not hard to exceed the torque your stepper motor and motor driver chips can deliver.  Fortunately I'd installed a geared extruder on my printer months ago, while trying to push the upper end of its printing speed.

I could have bought a geared stepper motor, or fit a gearbox on to my existing stepper, but to save money I decided to try and build my own gearbox first.  I got the idea after printing this amazing 6-speed automatic transmission model.  Printing and building it convinced me that the quality of parts from my printer were high enough to actually make working gears, so I set about designing my own geared extruder.   While the gear teeth were perfectly fine, the plastic-on-plastic bearings had far too much friction for an actual functional part, so my gearbox was designed to have R4RS bearings (chosen because I had 10 of them on hand) pressed into each gear.
I also replaced the plastic pins in the original transmission with metal shafts.  Here I'm using three 1/4" shoulder bolts (again, chosen because I had them on hand) with the heads cut off to couple the planet gears to the gear carrier, and a M5 machine screw as the shaft to connect the carrier to the filament drive pulley.  Using a machine screw as an output shaft is sadly not optimal.  I've managed to size it so the drive pulley is completely on the unthreaded part of the bolt (rather than resting on the threads), but the bolt isn't exactly the same diameter as the bore of the pulley, so there's a little bit of eccentricity as it turns.  That translates to a slight variance in punch pressure as the extruder runs.  This doesn't seem to be a problem yet, but I'd really like to replace that part with something custom-machined.
The extruder itself started off as a modified Airtripper design, but as is typical I've completely redesigned it from scratch.  Rather than two or four compression bolts I have a single bolt with a large hand-friendly knob pressed onto it.  This lets me easily and without any tools adjust the pressure on the filament.  It also lets me easily unclamp the pinch mechanism to completely release the filament, which I prefer to do when changing filament colors.  It's still not an ideal design - it takes a lot of turns to completely release the filament, and the threads on the screw strip after a few hundred cycles.  I've been meaning to redesign this with some kind of clever fast-release over-center clamp mechanism.
The completed extruder is admittedly huge.  The plastic gears work wonderfully, and have run for hundreds of hours of printing without any problems, but I did have to make them fairly large to handle the load.  A metal gearbox wouldn't have been any wider than the motor itself.  It's not really a problem since the extruder doesn't need to move or fit in a compact space, but can just sit out of the way at the top of the printer.


Looking up into the top of the printer.  The extruder mechanism is at the center.  The filament reel is on the top of the printer, with the filament fed down through a hole in the center of the upper plate.  Two small white LEDs are aimed at the point where the filament is pressed against the drive pulley, these cast enough light on that spot to let me see the filament drive is working properly.  I also have three fans arranged around the top end blowing air down into the print volume.  I'm not sure if these do much useful, but they look kind of cool.  You can also see my cheap little printed cable clamps, the heatsink for the 5V regulator for the fans and LEDs, and the terminal blocks which let me easily disconnect the cables to the end effector.

In addition to replacing the J-head, I've been experimenting with smaller layer height.  The default layer height setting on Slic3r is 0.4mm, which worked well enough for me when using my old 0.5mm nozzle.  The first few prints with the new nozzle were at 0.3mm, which along with the smaller nozzle made a noticeable improvement in print quality.  I tried pushing the layer height smaller, and discovered the microlayering function in Slic3r, which allows you to have different layer heights for perimeter and infill layers.  Unfortunately, when I tried printing objects at 0.135mm (with 0.27mm infill) I ran into an annoying bug where the printer would consistently freeze up mid-print when printing certain objects.  I've backed off to 0.18mm (with 0.36mm infill) which seems to be a sweet spot for reliability and detail on my printer.

Why those particular oddball heights?  My printer uses 36 tooth, 2mm pitch pulleys, motors with 1.8 degree step angle, and motor drivers with 16:1 microstepping.  If I've done the math correctly, that means that the physical resolution limit of my printer is 0.0225mm.  I had the idea that for consistent prints the layer Z-height should be an integral multiple of this resolution.  0.18mm is exactly 8 times the resolution limit, or equal to one half of a full 1.8 degree step of the motor, and the 0.36mm infill is happening exactly once per full step.  Given the way that a Delta printer works, where the physical Z height is determined by the combined action of three different motors, this may not matter as much as it would for a conventional cartesian axis printer.  I figure it doesn't hurt either, and with the 0.18mm/0.36mm layer height I'm getting some amazing print quality.


Monday, July 8, 2013

Tardis Prime - Version 2


I designed the original version of this toy as a personal challenge to see if I could - and in the process learned a lot about how to design complex moving parts for 3D printing.  The design was vastly more successful and popular than I expected, resulting in a lot of requests for printed copies, but I wasn't really happy with it.  The major body joints - hip, knee, waist, elbow - were all too wobbly and weak.  In robot form, the toy couldn't stand on its own, and the legs would sometimes even fall out when it was picked up.  The Tardis form didn't lock together well, with the legs spontaneously unfolding sometimes when picked up.  Several of the pin joints were prone to breaking, too much force applied across the grain of thin plastic pins.  It was also expensive and time-consuming to print, taking over a pound of plastic and several days of machine time.

I started over from scratch with the design, to make something more suited to be a mass-produced toy.  I scaled the original Tardis form by two-thirds (originally tried one-half scale, but my machine couldn't print the details small enough) and rethought every part of the toy to be simpler, easier to make, and more durable.  In the end I managed to reduce the weight to only six ounces, and reduced the part count from 71 to 36.  I also greatly simplified the leg joints, replacing the troublesome hip mechanism with one that used only horizontal pins that wouldn't fall out when the toy was picked up yet were still stiff enough to allow it to stand.
The torso has been significantly changed.  I kept the same shoulder articulation, but eliminated the sliding panels and telescoping neck in favor of simply rotating the head out through the open back.  The swinging windows panels are also eliminated, the back of the torso instead being closed by a piece of the lower back which swings up as the abdomen folds in.

The back of the legs are still fairly open, and the feet are basically just empty bits of body shell folded forward.  The legs were a major hassle to design, the new torso and abdomen structure took up a lot of the interior and in the end I was having to try and figure out how to fold stray scraps of Tardis shell panels into convincing legs and feet.
It can still sit down, but that's pretty much the extent of the leg articulation.  I had to sacrifice a lot of degrees of freedom in the waist and hips to make the body stiff enough to stand on its own.  The arms still have most of their mobility, although I did have to sacrifice the wrist joint.  There's just not enough room in the scaled-down hands to fit a plastic rotation pin inside.
Transformation starts by pulling down on the hips, unfolding the abdomen, lining up the lower back and hip plates, and then swinging the head back into the torso.


You then pull the telescoping black bar (that holds the head pivot stable in robot mode) upwards, swing the shoulder blocks inwards, and slot them together as shown.  This locks together tightly to make the top of the Tardis.  It took a lot of tweaking to get this to work properly, and I still think the bar is a little looser than it should be.
Getting the forearms into place is a little tricky.  There are pins and holes on the torso and forearm parts which lock them together in Tardis mode.  They're a little too secure - it's difficult to get the arms into place, and once in place they really don't want to come loose.  I still might need to adjust the clearances on these parts.


Transforming the legs is simple.  The feet fold back 135 degrees, making the flat bottom of the Tardis.  Note the recessed area and slot on the back of the folded leg assembly.

Then the legs fold forward and up.  A small post on the inner corner of each lower leg piece slots into a recess on the underside of the torso block, and the indented part on the back of the folded foot tucks into a locking ridge on the hips.  I didn't want this version to have the same problem with the legs spontaneously unfolding when picked up in Tardis mode.


It locks together extremely solidly in this form.  You can pick the Tardis up by any part of its structure and carry it around and it won't unfold or come apart - a huge improvement on the earlier version, which needed to be supported from the bottom when carried.
Still to do on this one:  make decals.  I wasn't happy with the look of the glued-on paper labels on the earlier version, so I'm looking for sticker paper that will work in my inkjet printer.  I'm also not sure how legible the labels will be when scaled down to this size.  When in Tardis mode, it's a surprisingly small toy - it's only four and a half inches tall, and two and a half inches wide.  Even in robot mode, it stands under nine inches tall.
It's almost like one of those puzzle boxes in this form, where you need to know exactly where to push on the outside to unlock it.  You start by pulling downward on the feet, at the back rear of the Tardis to unlock the friction tabs holding them in place.
You then pull the legs downwards and straighten them out as shown.  The pin joints in the hips and knees are angled such that the legs spread out slightly when unfolded.  Unfolding the legs also lets you loosen up the abdomen and torso parts enough to free the arms and shoulders.
The shoulder joints slide sideways with a little force, and the forearms come out at the same time.  It can stand in this form, even through the abdomen isn't properly locked together yet.

After freeing up the arms and shoulders, you rotate the head assembly 180 degrees to bring the head out of the torso, then slide the abdomen up to fold and lock the body.  The black bar on the back locks into the notch at the top of the abdomen and holds the head-pivot in place.  The rest of the back of the Tardis splits, the upper half becoming the rest of the back, and the lower half a sort of plate around the hips.


Straighten out the legs, and the robot stands easily on its own.  It's not very poseable, but I've decided that being able to stand is better than being a highly flexible plastic ragdoll.


That's version 2 of the design.  Like the original version of the toy, it was Featured on Thingiverse within a few days of being posted.  As of this writing the original version is at the top of the Popular Things list.  I don't expect this version to do quite as well - honestly I'm surprised that it was Featured at all - but it's gratifying to hear that other people are already printing their own copies.

Version 2 of this toy was a lot harder to design than the original.  Making something robust enough to be sold or given out as a toy is a lot more challenging than making a one-of-a-kind static model.  This design is still fairly crude compared to the actual commercial Transformer toys on the market now.  I've gained a lot more respect for what professional toy developers go through.


As with the previous version, a lot of people are asking me if I'm going to sell these.  While I may make a handful as gifts or to sell at upcoming conventions, I'm not intending to go into any kind of mass production.  3D printing simply isn't a cost-effective way to make a lot of something.  It's great for making prototypes, or limited runs of unique specialty items, but can't even remotely compete with traditional mass-production techniques like injection molding.  It takes my printer a full day of running nonstop to make the parts for one of these - and then an hour or so of my work finishing and cleaning up all the parts and assembling the toy.  I can't make these fast enough for it to be worth my time as a business.  Setting up mass-production is also out of the question - both due to the steep startup costs of having molds and tooling made, and because any actual commercial endeavor would bring down the wrath of the BBC's copyright lawyers (and possibly Hasbro as well).

Tuesday, June 25, 2013

Transforming Tardis: Many more photos


  Since being uploaded to Thingiverse and discovered by the internet, my transforming Tardis toy has attracted a lot more attention than I expected.  I designed the toy as a challenge to myself, and as a fun project to keep my mind busy during a week off work with not much else to do.  My creation has been covered by cnet, Topless Robot, 3ders, technabob, neatorama, and other places, as well as rising straight to the first page on the Popular Things list on Thingiverse.  And they're all using the same quick photo sets I took on our front porch, with that same dirty worn plastic bench as a backdrop.

 I wasn't expecting this sudden level of internet fame.  Had I been, I would have taken some better photos in the first place.  Here's an attempt to rectify that.

The transformation sequence starts with folding down the legs.  The heels swing back and latch into the ankles to form the feet.


Swing the hips forward, line up the feet, and the robot can wobbily stand.  Now the shoulders fold out from behind the torso, and the hands slide forwards.  Incidentally, hands are really hard to draw in AutoCAD. 
Now the head comes out of the torso.  I experimented with several different methods to make this work, trying to make the head as large as possible.  The first revision head was about half this size, and looked ridiculously out-of-scale with the rest of the robot. Sliding the entire top panel aside let me make the head take up most of the free space inside the torso.  The head has a fairly complex movement, swinging forward on a pivot while also sliding upwards on a shaft, while at the same time two little doors on the sides of the police-box swing back and close off the open back of the torso.


The bowtie comes out at the same time as the head.  Of course the robot has a bowtie.  Bowties are cool.

 Pull the head firmly upwards, and then slide the panels shut, and the transformation is done.


 It can even stand on its own, provided you very carefully balance it.  The hip joints are too loose, despite several attempts to make plastic springs and friction locks.  It's just too top-heave and falls over easily.  I managed to get it to stand in place long enough to take these photos.


 Sitting down is easier.  Taking the weight off your feet is the right of all sentient beings.

The only parts of this toy that wasn't printed on my 3D printer are the 'police box' labels above the windows, and the plaque by the front door.  These were printed on construction paper and glued in place.  That didn't work quite as well as Id hoped - the glue damaged the ink on the plaque, and the police box labels don't stick well.  I need to find a way to print on actual stickers.


 From the back, you can see that the legs are make up mostly of hollow sections of exterior paneling.  I tried to design the transformation sequence to have a minimum of 'kibble' - pieces only functional during one mode and just hanging out getting in the way in the other - and to be as mechanically solid as possible.  I had to compromise a bit on the legs, there's not much I could do with the extra bits of wall panels that needed to get folded away somewhere.  I am proud of the way the ankle and heel hook together - it locks solidly enough that the bot can stand on the feet easily, and both those hooks also lock to other parts to help hold the shell together when it's in Tardis mode.


The head is on the end of a complex bit of plastic that also connects to the flat black plate that carries one of the 'police box' labels.  When transforming back into a Tardis, the shoulders swing back and tuck under this bar.  It's a bit tricky the first few times you try, but really helps lock the body together.


It can sort of stand even in this mode, but has to lie down to finish transforming the legs.  The feet and legs unfold and wrap around to make the bottom of the box.
And now it's a Tardis again.  Looks completely natural, except for the large seams and joints everywhere.  I tried to work with the natural form of the Tardis, using existing joints and breaks in the structure, but there's only so much I can do. 


Finishing this project this week was lucky timing.  There are at least three other attempts to make a Tardis Transformer that I've seen (although I didn't know about any of them when I started this project) one of which was just published this week.  Complete coincidence that we all were working on the same idea at the same time.  I think my design is the only one to be completely 3D-printable and held together without using any glue or screws.  Most importantly, I was the first to publish and get media attention.  Just lucky that the timing worked out this way.

I have had a lot of requests from people who want to buy these.  I'm not sure if that will ever be able to happen.  This toy infringes on two different well-protected intellectual properties, and I have no desire to have copyright lawyers after me.  It's also complicated to build, takes a lot of plastic to print, and really wobbly and fragile in the hip and knee joints.  That part I can do something about - I have a scaled-down version under design that will have about half as many parts and hopefully more robust legs- but I certainly can't set up a storefront or advertise online to sell them.