What is it?
A walking machine, radially symmetrical, having four legs with two degrees of freedom each, controlled through a wireless link from a hand-held controller based on two Wii Nunchucks.
What's it for?
Amusement and entertainment. Mine, and that of people at parties and conventions which I bring it to. I make no pretense of any practical use of the robot, but it seems to draw a crowd and entertain. The robot also serves as an excuse for me to learn new skills in crafts and robotics, an excuse for me to experiment with microcontrollers, radio gear, metal etching and polishing, leatherworking, welding, and other such.
Is this something you bought or made from a kit?
This robot was designed and built from scratch. I am using quite a few off-the-shelf parts, including the servos, radio gear, and electronics boards, but the overall design is original and not based on any robot kit or toy.
How long did this take to make?
That’s hard to say. Building an entertaining little walking robot has been a hobby of mine for years. This particular robot has been a two-year project, starting shortly after GenCon 2007, worked on intermittently on spare weekends and evenings. It started with what was originally intended as an upgrade and repair of an earlier robot that then turned into a rebuild nearly from scratch. That robot was in turn based on an even earlier (and much less successful) robot I had in 2006, and so on. The earliest version of this quadruped design was built nearly a decade ago. It barely worked, but was enough fun for me to keep playing around with.
If I had to rebuild this bot from parts and raw materials, I could probably do it in a few weekends, but that of course would not include the time spent on research and design.
How much did it cost?
On this version of the robot, I estimate I’ve spend about a thousand dollars. Some of that was spent on parts that never ended up being used or broke and had to be replaced. On the other had the bot also includes some materials recycled from junk and scrapyards, so the actual cost to reproduce it from scratch is hard to estimate.
Why did you make it?
Many years ago I used to compete in robot combat competitions. Robot Wars (when it was in the US), BattleBots, Robotica, and various other local events. The RC airplane radio sets I used always came with a handful of little hobby servos. Meant for RC airplane use, they were too small and weak for combat robots. One bored day I took a look at the small pile of spare servos in my junk box and decided to do something fun with them. The end result didn’t walk very well or for very long, but was fun enough for me to continue refining the idea.
Years later I upgraded the design with better servos and higher capacity batteries, ending up with something that could actually walk well for more than a minute. I was by this time getting bored with the robot, but decided at the last minute to bring it along on a trip to GenCon. I had great fun walking the robot around the competition and entertaining people, although by the end of the convention the bot was pretty much trashed. Since then I’ve been working to improve the reliability and battery life, as well as the expressiveness and crowd-friendliness of the robot.
Are you making robots like this for sale?
I’ve considered it, but I do not have any plans to do so at this time. This robot is a hand-made piece of mechanical art, which I am constantly tinkering with and improving. I am not confident in the reliability of this design yet, and for what I would need to charge for my time to build it and the parts and materials I would not feel right selling anything but an absolutely finished and reliable machine. If I was mass-producing these by the thousand with injection-molded plastic parts and assembly by sweatshops in China I could sell these at a reasonable price, but I have neither the interest nor the startup money to pursue that path.
I have been working on making electronic jewelry with similar design themes which I may be selling on a limited basis in the future. I could also probably be persuaded to do custom work on commission. I don’t intend to offer standard pre-made robot kits of this design.
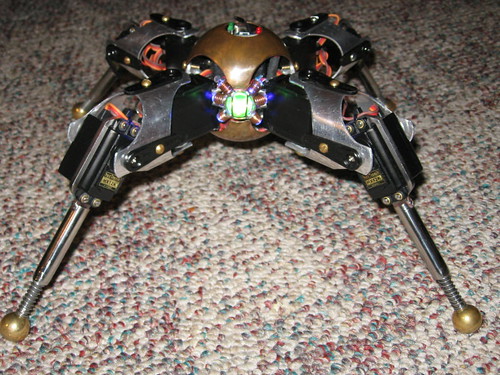
What's it made from?
The primary chassis of the robot is made from a single piece of waterjet-cut steel plate from Big Blue Saw. I was originally reluctant to order parts made for the robot as I wanted as much of it as possible to be hand-made, but having parts custom-cut turned out to be a very good idea. I was able to get some very complex and organic pieces of metal made with great precision, which eliminated issues with servo alignment in previous versions. The steel frame also takes up very little of the limited internal space in the robot, yet provides secure mounting points for the servos, bodywork, battery, and other internal parts.
The shell of the main body was made from a three inch diameter copper tank float. Spherical because I wanted to go with a rounded, organic-feeling design, and copper because I was aiming for a sort of steampunk theme, with hand-cut openings for the legs. Outward from that are the four leg midsection pieces which were also hand-cut from 2 inch diameter aluminum tube. The outer segment of each leg has another waterjet-cut steel piece, with a welded steel tube housing a spring-loaded telescoping ankle segment in the end. The feet are brass knobs, into which the shoulder screws which make up the mobile part of the telescoping section screw into.
The electronics of the robot are fairly simple. For me this project was always about mechanical design and packaging, with control electronics a secondary concern. The robot runs off a 7.4V 1100mAh LiPoly battery. I use a pair of XBee radio modules for communication. A Pololu micro SSC board receives a serial data stream from the transmitter via the XBee radios and generates the control pulses for eight HX12K servos.
What's the glowey thing on the front?
The power indicator. It tells me the main power is on and shows which side of the robot is the front. It is made from a 5/8 inch uranium-glass marble held in a copper wire cage, surrounded by six high-power ultraviolet LEDs. The UV light from the LEDs makes the uranium-glass marble glow a nifty green color when the main power switch is on.
A rule I set for myself on this robot was that it would have no purely decorative parts. Functional parts could also be made decorative so long as their function was not impaired. Showing that the power is on and indicating which way is the front is to me more than enough function to justify a glowing marble and LED array.
How long does the battery last?
I’m really not sure. I’ve never run the robot non-stop from full power to battery exhaustion. I originally estimated half an hour of total run time, but that might have been an overly optimistic estimation.
Is that a Wii Nunchuck?
Two, actually. Previous versions of this robot used a RC airplane radio set for control, but for this version I wanted something less obvious and more compact. Something I could hold in one hand and conceal easily. The Wii Nunchuck is a pretty cool option – you get a joystick, triple-axis accelerometer, two buttons, and a housing with some extra space for a battery and radio for a pretty low price. I originally planned to use a single Nunchuck, controlling the motion of the robot with the joystick and accelerometer-sensed hand gestures. Along the way I decided I wanted a second joystick after all, so I bought a second Nunchuck for two-handed control. I also didn’t quite manage to fit the microcontroller and radio into the housing of the first one cleanly. The controller is a bit of an ugly hack – I intend to improve it cosmetically in the future, but for now just having it work was the priority.
What kind of electronics are in there?
The left-hand Wii Nunchuck is mostly unmodified. It has a joystick, accelerometer, and a microcontroller which samples sensor data and communicates over a serial data line. It is taped together because I opened it up before deciding to leave it functionally unmodified.
The right-hand Wii Nunchuck has been gutted and rebuilt. I removed all of the internal electronics except for the joystick and buttons, and installed a FunnelIO Arduino board, accelerometer, LiPoly battery, and XBee radio module from sparkfun. The accelerometer, joystick, and buttons in that unit are tied to the analog and digital inputs on the FunnelIO. The serial lines from the other Wii are tied into the SDA/SCL serial port on the Arduino. I use the Wii Nunchuk communication code from Windmeadow Labs (www.windmeadow.com) to get the data from the left-hand Nunchuck.
The Arduino takes the data from the unmodified Nunchuck, the analog values from the joystick and accelerometer on the modified Nunchuk, does some math to determine servo positions, and transmits serial data at 38400bps through the XBee radio link to the Pololu serial servo controller board in the robot. There’s also a battery management board in the robot which shuts off the battery in undervoltage, overvoltage, or overcurrent conditions.
I did not make any custom PCBs for this design. Previous versions of the robot did have custom-made PCBs, but thanks to Sparkfun and Pololu I was able to build the entire control and power system with off-the-shelf boards.
How do you control it?
Control of the robot is through the joysticks on the two Wii Nunchucks. I have some plans for control schemes based on accelerometer data in addition to the joysticks, but I haven’t implemented them yet. I will be experimenting with that in the future.
The control scheme for the robot does not use any pre-programmed sequencing. That is, all the movement of the legs is based on the immediate position of the joysticks and the mixing mode selected, so that in order to make the robot walk I have to move the sticks back and forth with each step. I had in previous versions had pre-programmed sequences for walking, but decided that manual leg control resulted in more fluid, lifelike motion, as well as a lot of flexibility for posing and gesturing.
There are multiple mixing algorithms I can choose from by pressing different combinations of the buttons on the Wii Nunchucks, depending on what I want the robot to do. I can also press a button which inverts the movement on the up/down servos and swaps the left and right servo movements. Because the body is top/bottom and left/right symmetrical, this lets me reconfigure the robot to walk upside-down if it flips over. Which it does fairly frequently.
The robot has essentially no on-board processing, other than that required for error-checking and decoding the serial data stream from the hand controller.
What's the radio range?
Not very long – about 20 feet before control becomes intermittent. I am using the lowest-power version of the XBee radios. I may move to the higher-power version in the future, if I want better range, but for now I don’t like to have the robot that far from me while controlling it.
Is this based on a Dragoon from Starcraft?
No. I’ve never even played Starcraft. I didn’t even know what a Dragoon was until I went and looked it up after enough people asked me if I’d based this on that design.
So where did the design come from?
As mentioned above the first version was built as something fun to do with leftover hobby servos. I had eight servos, so a robot with four legs, two servos per leg, worked out well. I was also at the time considering the challenge of making a walking robot for competition use. Working with cheap and weak servos and not having the budget for elaborate balancing systems, I looked at turtles for design inspiration. Rigid body, not much need to balance, four short stubby legs – seemed like I could do that. I made it with radial symmetry to keep the design simple and make it able to walk in any direction. Being able to walk upside-down didn’t come till much later.
I never ended up adapting the design for any competition. Making it to be a free-form entertainment robot was more fun for me.
How much does it weigh?
2 lbs 10.9 oz, or just a bit over two and a half pounds.
No comments:
Post a Comment